So what is a “dynamic” radial menu? Simply put, it is a radial menu that adjusts to fit all of the menu content inside the screen.
While working on my latest game, I needed such a menu. Players can tap near the edges of the screen, and it wouldn’t look nice just to offset the menu so it fits.
This is a short overview of ideas behind my implementation.
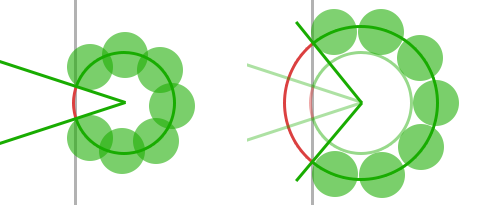
1. Find the available angle range
The first step in creating a dynamic radial menu is to find the available angle range. This means that we need to check how much of the circle is available for laying out the menu items.
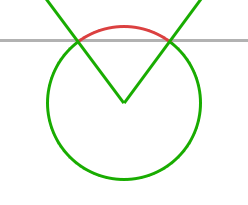
With some trigonometry it’s easy enough to calculate points on the circle, then check if they’re in screen bounds with RectTransformUtility.RectangleContainsScreenPoint.
There are two important things to pay attention to when implementing this.
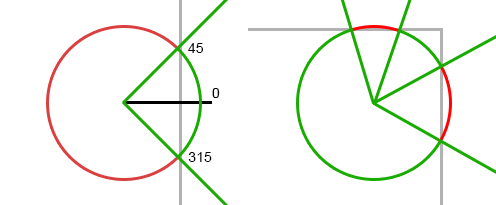
First, the angle range can start at a large angle, for example 315, and wraparound to 45. Which means it’s not enough to simply loop from 0-359.
Second, it is possible to have two valid angle ranges. This happens in corners, where there is a smaller angle range closer to the corner, and a larger one on the opposite side. Discarding the smaller angle range solves this problem.
2a. The happy path: draw menu items
In most cases there will be no breaks in the menu, and we can place the menu items.
2b. Rotate to fit
Sometimes it is enough to rotate the menu items, so they can all fit in the screen. This is possible when the unavailable angle range is smaller than the distance between two menu items.
3. Scale to fit
At this point, items have to be drawn in the available angle range.
Since rotation is not enough, we have to increase the menu radius until all items can fit in the available angle range. Unfortunately this is not possible to calculate analytically (at least with the information we have at this point), so we have to increase the radius incrementally.
We also need to recalculate the available angle range for the adjusted menu radius so that items don’t go out of bounds.
4. Order the items
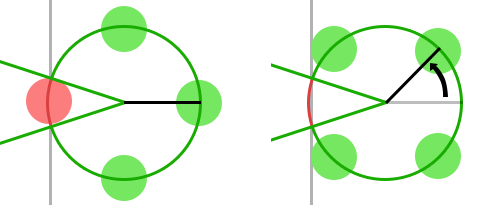
Drawing the items in the available range might cause them to appear offset, depending on the starting point of the available range.

To solve this we need to calculate which item would be nearest to the angle range start, without scaling and rotation. So we might start drawing the third item first, to keep the appearance of correct ordering.

Conclusion
While I didn’t go into any math, this post should give you an idea of how to get started and what to expect.
In the end I spent 52 hours implementing a version of the menu I was happy with (which includes features not mentioned here). For my project this was bit of an overkill, but I hope someone will find this information helpful.
Shameless plug: If you’re looking for a ready made dynamic radial menu, please check out my asset on the Unity Asset Store